一、入门
简介
安全框架概述
什么是安全框架? 解决系统安全问题的框架。如果没有安全框架,我们需要手动处理每个资源的访问控制,非常麻烦。使用安全框架,我们可以通过配置的方式实现对资源的访问限制。
常用安全框架
- Spring Security:Spring家族一员。是一个能够为基于Spring的企业应用系统提供声明式的安全访问控制解决方案的安全框架。它提供了一组可以在Spring应用上下文中配置的Bean,充分利用了Spring IoC / DI(控制反转Inversion of Control,DI:Dependency Injection 依赖注入)和 AOP(面向切面编程) 功能,为应用系统提供声明式的安全访问控制功能,减少了为企业系统安全控制编写大量重复代码的工作。
- Apache Shiro:轻量,一个功能强大且易于使用的Java安全框架,提供了认证,授权,加密,和会话管理
ssm+Shiro
springBoot+SpringSecurity
SpringSecurity
Spring Security是一个高度自定义的安全框架。利用 Spring IoC/DI和AOP功能,为系统提供了声明式安全访问控制功能,减少了为系统安全而编写大量重复代码的工作。使用 Spring Secruity 的原因有很多,但大部分都是发现了 javaEE的 Servlet 规范或 EJB 规范中的安全功能缺乏典型企业应用场景。同时认识到他们在 WAR 或 EAR 级别无法移植。因此如果你更换服务器环境,还有大量工作去重新配置你的应用程序。使用 Spring Security解决了这些问题,也为你提供许多其他有用的、可定制的安全功能。正如你可能知道的两个应用程序的两个主要区域是“认证”和“授权”(或者访问控制)。这两点也是Spring Security 重要核心功能。
“认证”,是建立一个他声明的主体的过程(一个“主体”一般是指用户,设备或一些可以在你的应用程序中执行动作的其他系统),通俗点说就是系统认为用户是否能登录。
“授权”指确定一个主体是否允许在你的应用程序执行一个动作的过程。通俗点讲就是系统判断用户是否有权限去做某些事情
依赖
需要有thymeleaf才能访问templates
<dependency>
    <groupId>org.springframework.boot</groupId>
    <artifactId>spring-boot-starter-web</artifactId>
</dependency>

<dependency>
    <groupId>org.springframework.boot</groupId>
    <artifactId>spring-boot-starter-security</artifactId>
</dependency>

<dependency>
    <groupId>org.springframework.boot</groupId>
    <artifactId>spring-boot-starter-thymeleaf</artifactId>
</dependency>
配置
spring.security.user.name=admin
spring.security.user.password=admin

# 先不用
security.basic.enabled = false
开始
@SpringBootApplication
@ComponentScan("com.ming.secruity")
public class SecurityApplication {
    public static void main(String[] args) {
        SpringApplication.run(SecruityApplication.class, args);
    }
}

@Controller
@RequestMapping("/")
public class Index {
    @RequestMapping("/")
    public String index() {
        return "index";
    }
}
类
UserDetailService / UserDetail / User / PasswordEncoder -> BCryptPasswordEncoder
UserDetailService
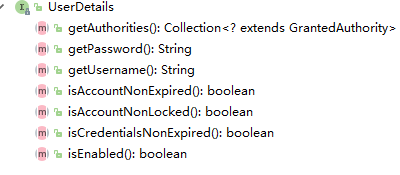
当什么也没有配置的时候,账号和密码是由 Spring Security 定义生成的。而在实际项目中账号和密码都是从数据库中查询出来的。所以我们要通过自定义逻辑控制认证逻辑。
如果需要自定义逻辑时,只需要实现 UserDetailsService 接口即可。
实现查询数据库用户名和密码过程
UserDetails loadUserByUsername(String username) throws UsernameNotFoundException;UserDetails
User
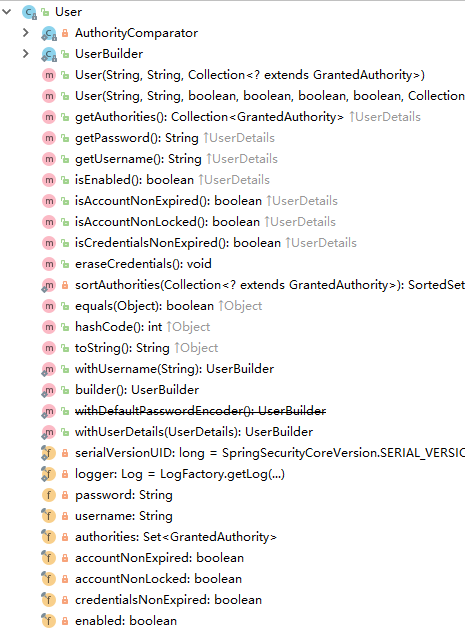
构造方法
其中构造方法有两个,调用其中任何一个都可以实例化
UserDetails 实现类 User 类的实例。而三个参数的构造方法实际上也是调用 7 个参数的构造方法。
username :用户名
password :密码
authorities :用户具有的权限。此处不允许为 null
此处的用户名应该是客户端传递过来的用户名。而密码应该是从数据库中查询出来的密码。SpringSecurity 会根据 User 中的 password 和客户端传递过来的 password 进行比较。如果相同则表示认证通过,如果不相同表示认证失败。
方法参数
方法参数表示用户名。此值是客户端表单传递过来的数据。默认情况下必须叫 username ,否则无法接收。
异常
UsernameNotFoundException 用户名没有发现异常。在 loadUserByUsername 中是需要通过自己的逻辑从数据库中取值的。如果通过用户名没有查询到对应的数据,应该抛出UsernameNotFoundException ,系统就知道用户名没有查询到。
PasswordEncoder
Spring Security 要求容器中必须有 PasswordEncoder 实例。所以当自定义登录逻辑时要求必须给容器注入 PaswordEncoder 的bean对象。
数据加密接口,用于返回User对象里面密码加密。
接口介绍
encode() :把参数按照特定的解析规则进行解析。
matches() :验证从存储中获取的编码密码与编码后提交的原始密码是否匹配。如果密码匹配,则返回 true;如果不匹配,则返回 false。第一个参数表示需要被解析的密码。第二个参数表示存储的密码。
upgradeEncoding() :如果解析的密码能够再次进行解析且达到更安全的结果则返回 true,否则返回 false。默认返回 false。
BCryptPasswordEncoder
BCryptPasswordEncoder 是 Spring Security 官方推荐的密码解析器,平时多使用这个解析器。
BCryptPasswordEncoder 是对 bcrypt 强散列方法的具体实现。是基于Hash算法实现的单向加密。可以通过strength控制加密强度,默认 10.
需要在SecurityConfig配置类中@Bean返回PasswordEncoder实现类,将默认使用该对象
UsernamePasswordAuthenticationFilter
默认username和password、Post请求
public static final String SPRING_SECURITY_FORM_USERNAME_KEY = "username";
public static final String SPRING_SECURITY_FORM_PASSWORD_KEY = "password";
private String usernameParameter = "username";
private String passwordParameter = "password";
private boolean postOnly = true;
Authentication
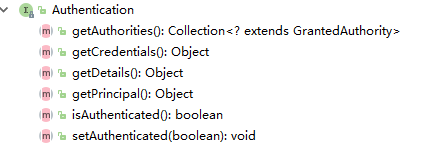
权限、凭证、详情、对象UserDetail实现类(User)、是否被认证、设置认证
原理
过滤器链
本质是一个过滤器链:
FilterSecurityInterceptor:方法级的权限过滤器,基本位于过滤器链的最底部。
ExceptionTranslationFilter:异常过滤器,处理认证授权过程中抛出的异常
UsernamePasswordAuthenticationFilter:对/login的POST请求做拦截,校验表单中用户名,密码
过滤器
配置DelegatingFilterProxy,doFilter -> initDelegate -> FilterChainProxy加载过滤器链
二、 Demo
static/login.html
<form action="/login" method="post">
    <input type="text" name="username">
    <input type="password" name="password">
    <input type="submit">
</form>
UserDetailServiceImpl
package com.ming.securitytest.service;

import org.springframework.beans.factory.annotation.Autowired;
import org.springframework.security.core.authority.AuthorityUtils;
import org.springframework.security.core.userdetails.User;
import org.springframework.security.core.userdetails.UserDetails;
import org.springframework.security.core.userdetails.UserDetailsService;
import org.springframework.security.core.userdetails.UsernameNotFoundException;
import org.springframework.security.crypto.password.PasswordEncoder;
import org.springframework.stereotype.Service;

@Service
public class UserDetailServiceImpl implements UserDetailsService {
    @Autowired
    private PasswordEncoder passwordEncoder;

    @Override
    public UserDetails loadUserByUsername(String username) throws UsernameNotFoundException {
        if(!"admin".equals(username)) {
            throw new UsernameNotFoundException("用户名不存在");
        }
        String password = passwordEncoder.encode("admin");
        // ROLE_开头,为角色
        return new User(username, password, AuthorityUtils.commaSeparatedStringToAuthorityList("admin,normal,ROLE_admin,ROLE_vip1,/main.html"));
    }
}
SecurityConfig
access("permitAll") => permitAll()
access(" hasRole('adb')" )
可以http…and()连接
package com.ming.securitytest.config;

import com.ming.securitytest.handle.MyAccessDeniedHandler;
import com.ming.securitytest.handle.MyAuthenticationFailureHandler;
import com.ming.securitytest.handle.MyAuthenticationSuccessHandle;
import org.springframework.beans.factory.annotation.Autowired;
import org.springframework.context.annotation.Bean;
import org.springframework.context.annotation.Configuration;
import org.springframework.http.HttpMethod;
import org.springframework.security.config.annotation.web.builders.HttpSecurity;
import org.springframework.security.config.annotation.web.configuration.WebSecurityConfigurerAdapter;
import org.springframework.security.crypto.bcrypt.BCryptPasswordEncoder;
import org.springframework.security.crypto.password.PasswordEncoder;

@Configuration
public class SecurityConfig extends WebSecurityConfigurerAdapter {
    @Autowired
    private MyAccessDeniedHandler myAccessDeniedHandler;

    @Override
    protected void configure(HttpSecurity http) throws Exception {
        http.formLogin()
                // 自定义参数
//                .usernameParameter("username12")
//                .passwordParameter("password12")
                // 自定义登录页
                .loginPage("/login.html")
                // 必须和表单提交的接口一样,才会执行自定义逻辑
                .loginProcessingUrl("/login")
                // 必须是POST请求
                .successForwardUrl("/toMain")
                // 自定义登录成功处理器,可以不用Post
//                .successHandler(new MyAuthenticationSuccessHandle("/main.html"))
                .failureForwardUrl("/toError")
//                .failureHandler(new MyAuthenticationFailureHandler("/error.html"))
        ;

        // 哪些路径不需要认证
        http.authorizeRequests()
                // 放行
                .antMatchers("/login.html").permitAll()
                .antMatchers("/error.html").permitAll()

                // 文件放行
//                .antMatchers("/css/**", "/js/**", "/images/**").permitAll() // 放行静态目录下的所有文件
//                .antMatchers("/**/*.png").permitAll() // 放行.png文件
//                .regexMatchers(".+[.]png").permitAll()  // 放行.png文件
//                .regexMatchers(HttpMethod.POST, "/demo").permitAll() // 指定请求方法
                // mvc 匹配,application.properties spring.mvc.servlet.path=/mingyue,控制器都以这个开头
//                .mvcMatchers("/demo").servletPath("/mingyue").permitAll()

                /* 权限控制 */
//                .antMatchers("/vip.html").hasAuthority("admin")
//                .antMatchers("/vip.html").hasAnyAuthority("admin", "vip1")

                /* 角色控制 */
//                .antMatchers("/vip.html").hasRole("vip1")
//                .antMatchers("/vip.html").hasAnyRole("vip1", "admin") // 角色ROLE_admin

                /* IP控制 */
                .antMatchers("/vip.html").hasIpAddress("127.0.0.1")

                .anyRequest().authenticated();  // 所有请求都必须认证
                /* 自定义access */
//                .anyRequest().access("@myServiceImpl.hasPermission(request, authentication)");


        // 自定义异常处理
        http.exceptionHandling()
                .accessDeniedHandler(myAccessDeniedHandler);

        // 关闭csrf防护,否则无法登录
        http.csrf().disable();
    }

    @Bean
    public PasswordEncoder getPw() {
        return new BCryptPasswordEncoder();
    }


}
LoginController
@Controller
public class LoginController {
    @RequestMapping("/toMain")
    public String toMain() {
        return "redirect:/main.html";
    }

    @RequestMapping("/toError")
    public String toError() {
        return "redirect:error.html";
    }

}
自定义成功/失败处理器
.successHandler( new MyAuthenticationSuccessHandle("/main.html") ),就可以不使用POST方式
失败
package com.ming.securitytest.handle;

import org.springframework.security.core.AuthenticationException;
import org.springframework.security.web.authentication.AuthenticationFailureHandler;

import javax.servlet.ServletException;
import javax.servlet.http.HttpServletRequest;
import javax.servlet.http.HttpServletResponse;
import java.io.IOException;

public class MyAuthenticationFailureHandler implements AuthenticationFailureHandler {
    private String url;

    public MyAuthenticationFailureHandler(String url) {
        this.url = url;
    }

    @Override
    public void onAuthenticationFailure(HttpServletRequest httpServletRequest, HttpServletResponse httpServletResponse, AuthenticationException e) throws IOException, ServletException {
//        httpServletRequest.getRequestDispatcher(url).forward(httpServletRequest, httpServletResponse);
        httpServletResponse.sendRedirect(url);
    }
}
成功
package com.ming.securitytest.handle;

import org.springframework.security.core.Authentication;
import org.springframework.security.web.authentication.AuthenticationSuccessHandler;

import javax.servlet.ServletException;
import javax.servlet.http.HttpServletRequest;
import javax.servlet.http.HttpServletResponse;
import java.io.IOException;

public class MyAuthenticationSuccessHandle implements AuthenticationSuccessHandler {
    private String url;

    public MyAuthenticationSuccessHandle(String url) {
        this.url = url;
    }

    @Override
    public void onAuthenticationSuccess(HttpServletRequest httpServletRequest, HttpServletResponse httpServletResponse, Authentication authentication) throws IOException, ServletException {
        System.out.println(authentication.getAuthorities());
        System.out.println(authentication.getCredentials());
        System.out.println(authentication.getDetails());
        System.out.println(authentication.getPrincipal());
        System.out.println(authentication.getName());
        httpServletResponse.sendRedirect(url);
    }
}
自定义异常
package com.ming.securitytest.handle;

import org.springframework.context.annotation.ComponentScan;
import org.springframework.security.access.AccessDeniedException;
import org.springframework.security.web.access.AccessDeniedHandler;
import org.springframework.stereotype.Component;

import javax.servlet.ServletException;
import javax.servlet.http.HttpServletRequest;
import javax.servlet.http.HttpServletResponse;
import java.io.IOException;
import java.io.PrintWriter;

@Component
public class MyAccessDeniedHandler implements AccessDeniedHandler {
    @Override
    public void handle(HttpServletRequest httpServletRequest, HttpServletResponse httpServletResponse, AccessDeniedException e) throws IOException, ServletException {
        // 403
        httpServletResponse.setStatus(HttpServletResponse.SC_FORBIDDEN);
        // 返回JSON
        httpServletResponse.setContentType("application/json;charset=utf-8");
        PrintWriter writer = httpServletResponse.getWriter();
        writer.write("{\"status\":\"error\",\"msg\":\"权限不足\"}");
        writer.flush();
        writer.close();
    }
}
自定义Access
package com.ming.securitytest.service;

import org.springframework.beans.factory.annotation.Autowired;
import org.springframework.security.core.authority.AuthorityUtils;
import org.springframework.security.core.userdetails.User;
import org.springframework.security.core.userdetails.UserDetails;
import org.springframework.security.core.userdetails.UserDetailsService;
import org.springframework.security.core.userdetails.UsernameNotFoundException;
import org.springframework.security.crypto.password.PasswordEncoder;
import org.springframework.stereotype.Service;

@Service
public class UserDetailServiceImpl implements UserDetailsService {
    @Autowired
    private PasswordEncoder passwordEncoder;

    @Override
    public UserDetails loadUserByUsername(String username) throws UsernameNotFoundException {
        if(!"admin".equals(username)) {
            throw new UsernameNotFoundException("用户名不存在");
        }
        String password = passwordEncoder.encode("admin");
        // ROLE_开头,为角色
        return new User(username, password, AuthorityUtils.commaSeparatedStringToAuthorityList("admin,normal,ROLE_admin,ROLE_vip1,/main.html"));
    }
}
三、进阶
注解访问
在 Spring Security 中提供了一些访问控制的注解。这些注解都是默认是都不可用的,需要通过@EnableGlobalMethodSecurity 进行开启后使用。
如果设置的条件允许,程序正常执行。如果不允许会报 500
这些注解可以写到 Service 接口或方法上,也可以写到 Controller或 Controller 的方法上。通常情况下都是写在控制器方法上的,控制接口URL是否允许被访问。
一、开启注解
启动类 @EnableGlobalMethodSecurity(securedEnabled = true, prePostEnabled= true)
二、Secured
@Secured 是专门用于判断是否具有角色的。能写在方法或类上。参数要以 ROLE_开头。
方法前@Secured("admin") @Secured({"admin", "ROLE_manager"})
三、PreAuthorize
方法前判断权限
@PreAuthorize("hasRole('admin')")

@PreAuthorize("hasRole('normal') AND hasRole('admin')")    // 有没有ROLE_都行

@PreAuthorize("hasAuthority('admin')")
四、PostAuthorize
方法之后校验
五、PostFilter
权限验证后对返回的数据进行过滤
@ResponseBody
@GetMapping("/testFilter")
@PostFilter("filterObject.username == 'admin'")
public List<User> testFilter() {
User user = new User();
user.setUsername("admin");
User user1 = new User();
user1.setUsername("admin1");
List<User> list = new ArrayList<>();
list.add(user);
list.add(user1);
return list;
}六、PreFilter
传入的参数进行过滤
@PreFilter(value = "filterObject.id%2==0")
public void test()
七、所有表达式
| 表达式 | 备注 |
|---|---|
| hasRole([role]) | 如果有当前角色, 则返回 true(配置不中不允许ROLE_,注解中允许添加ROLE_) |
| hasAnyRole([role1, role2]) | 如果有任一角色即可通过校验, 返回true,(会自动加上 ROLE_ 前缀) |
| hasAuthority([authority]) | 如果有指定权限, 则返回 true |
| hasAnyAuthority([authority1, authority2]) | 如果有任一指定权限, 则返回true |
| principal | 获取当前用户的 principal 主体对象 |
| authentication | 获取当前用户的 authentication 对象, |
| permitAll | 总是返回 true, 表示全部允许 |
| denyAll | 总是返回 false, 代表全部拒绝 |
| isAnonymous() | 如果是匿名访问, 返回true |
| isRememberMe() | 如果是remember-me 自动认证, 则返回 true |
| isAuthenticated() | 如果不是匿名访问, 则返回true |
| isFullAuthenticated() | 如果不是匿名访问或remember-me认证登陆, 则返回true |
| hasPermission(Object target, Object permission) | |
| hasPermission(Object target, String targetType, Object permission) |
RememberMe
一、原理
cookie(加密串)+ 数据库(加密串、用户信息字符串)等
获取cookie信息,拿着cookie信息到数据库对比,如果查询到对应信息,认证成功过,可以登录

二、依赖
Spring Security 实 现 Remember Me 功 能 时 底 层 实 现 依 赖Spring-JDBC
<!-- mybatis 依赖 -->
<dependency>
    <groupId>org.mybatis.spring.boot</groupId>
    <artifactId>mybatis-spring-boot-starter</artifactId>
    <version>2.1.1</version>
</dependency>
<!-- mysql 数据库依赖 -->
<dependency>
    <groupId>mysql</groupId>
    <artifactId>mysql-connector-java</artifactId>
    <version>8.0.18</version>
</dependency>
三、配置
spring.datasource.driver-class-name= com.mysql.cj.jdbc.Driver
spring.datasource.url= jdbc:mysql://localhost:3306/security?useUnicode=true&characterEncoding=UTF-8&serverTimezone=Asia/Shanghai
spring.datasource.username= root
spring.datasource.password= root
四、使用
remember-me Cookie
<input type="checkbox" name="remember-me" value="true"/>通过JDBC存放
@Autowired
private DataSource dataSource;
@Autowired
private PersistentTokenRepository persistentTokenRepository;
@Autowired
private UserDetailServiceImpl userDetailService;


http.rememberMe()
                .tokenRepository(persistentTokenRepository) // token存放
//                .rememberMeParameter("myRememberMe") //自定义名称
                .tokenValiditySeconds(30) // 默认有效两周
                .userDetailsService(userDetailService); // 用户信息


@Bean
public PersistentTokenRepository persistentTokenRepository() {
    JdbcTokenRepositoryImpl jdbcTokenRepository = new JdbcTokenRepositoryImpl();
    // 设置数据源
    jdbcTokenRepository.setDataSource(dataSource);
    // 自动建表,第二次启动时注释掉
    //  jdbcTokenRepository.setCreateTableOnStartup(true);
    return jdbcTokenRepository;
}
ThymeLeaf
介绍
Spring Security 可以在一些视图技术中进行控制显示效果。例如: JSP 或 Thymeleaf 。在非前后端分离且使用 Spring Boot 的项目中多使用 Thymeleaf 作为视图展示技术
依赖
<!--thymeleaf springsecurity5 依赖-->
<dependency>
    <groupId>org.thymeleaf.extras</groupId>
    <artifactId>thymeleaf-extras-springsecurity5</artifactId>
</dependency>
<!--thymeleaf依赖-->
<dependency>
    <groupId>org.springframework.boot</groupId>
    <artifactId>spring-boot-starter-thymeleaf</artifactId>
</dependency>
使用
<html xmlns="http://www.w3.org/1999/xhtml"
      xmlns:th="http://www.thymeleaf.org"
      xmlns:sec="http://www.thymeleaf.org/thymeleaf-extras-springsecurity5">
获取属性
可以在html页面中通过 sec:authentication="" 获取UsernamePasswordAuthenticationToken 中所有 getXXX 的内容,包含父类中的 getXXX 的内容。
根据源码得出下面属性:
- name :登录账号名称
- principal :登录主体,在自定义登录逻辑中是 UserDetails
- credentials :凭证
- authorities :权限和角色
- details :实际上是 WebAuthenticationDetails 的实例。可以获取 remoteAddress (客户端ip)和 sessionId (当前 sessionId)
demo
<!DOCTYPE html>
<html xmlns="http://www.w3.org/1999/xhtml"
      xmlns:th="http://www.thymeleaf.org"
      xmlns:sec="http://www.thymeleaf.org/thymeleaf-extras-springsecurity5">
<head>
    <meta charset="UTF-8">
    <title>Title</title>
</head>
<body>
    登录账号:<span sec:authentication="name"></span><br/>
    登录账号:<span sec:authentication="principal.username"></span><br/>
    凭证:<span sec:authentication="credentials"></span><br/>
    权限和角色:<span sec:authentication="authorities"></span><br/>
    客户端地址:<span sec:authentication="details.remoteAddress"></span><br/>
    sessionId:<span sec:authentication="details.sessionId"></span><br/>


    通过权限判断:
    <button sec:authorize="hasAuthority('/insert')">新增</button>
    <button sec:authorize="hasAuthority('/delete')">删除</button>
    <button sec:authorize="hasAuthority('/update')">修改</button>
    <button sec:authorize="hasAuthority('/select')">查看</button>
    <br/>
    通过角色判断:
    <button sec:authorize="hasRole('admin')">新增</button>
    <button sec:authorize="hasRole('admin')">删除</button>
    <button sec:authorize="hasRole('admin')">修改</button>
    <button sec:authorize="hasRole('admin')">查看</button>
</body>
</html>
logout
<a href="/logout">退出</a>http.logout()
// .logoutUrl("/user/logout") // 也是要和链接一样
.logoutSuccessUrl("/login.html")
.permitAll();CSRF
从刚开始学习Spring Security时,在配置类中一直存在这样一行代码: http.csrf().disable(); 如
果没有这行代码导致用户无法被认证。这行代码的含义是:关闭 csrf 防护。
什么是CSRF
CSRF(Cross-site request forgery)跨站请求伪造,也被称为“OneClick Attack” 或者 SessionRiding。通过伪造用户请求访问受信任站点的非法请求访问。
跨域:只要网络协议,ip 地址,端口中任何一个不相同就是跨域请求。
客户端与服务进行交互时,由于 http 协议本身是无状态协议,所以引入了cookie进行记录客户端身份。在cookie中会存放session id用来识别客户端身份的。在跨域的情况下,session id 可能被第三方恶意劫持,通过这个 session id 向服务端发起请求时,服务端会认为这个请求是合法的,可能发生很多意想不到的事情。
Spring Security中的CSRF
从 Spring Security4开始CSRF防护默认开启。默认会拦截请求。进行CSRF处理。CSRF为了保证不是其他第三方网站访问,要求访问时携带参数名为 _csrf 值为token(token 在服务端产生)的内容,如果token和服务端的token匹配成功,则正常访问。
PATCH,POST,PUT,DELETE方法进行防护
不开启CSRF
CsrfFilter
// http.csrf().disable();添加_csrf,需要将token字符串携带过来,token和session存储的token是否一样
<!DOCTYPE html>
<html xmlns="http://www.w3.org/1999/xhtml"
xmlns:th="http://www.thymeleaf.org"
xmlns:sec="http://www.thymeleaf.org/thymeleaf-extras-springsecurity5">
<head>
<meta charset="UTF-8">
<title>Title</title>
</head>
<body>
<form action="/login" method="post">
<input type="hidden" name="_csrf" th:value="${_csrf.token}" th:if="${_csrf.token}"/>
<input type="text" name="username">
<input type="password" name="password">
<input type="submit">
</form>
</body>
</html>Oauth2
介绍
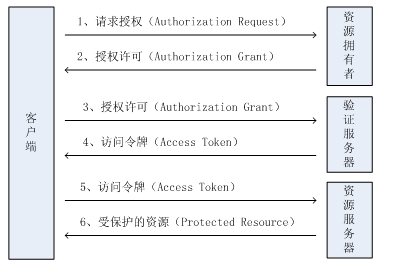
第三方认证技术方案最主要是解决认证协议的通用标准问题,因为要实现跨系统认证,各系统之间要
遵循一定的接口协议。
OAUTH协议为用户资源的授权提供了一个安全的、开放而又简易的标准。同时,任何第三方都可以使用OAUTH认证服务,任何服务提供商都可以实现自身的OAUTH认证服务,因而OAUTH是开放的。业界提供了OAUTH的多种实现如PHP、JavaScript,Java,Ruby等各种语言开发包,大大节约了程序员的时间,因而OAUTH是简易的。互联网很多服务如Open API,很多大公司如Google,Yahoo,Microsoft等都提供了OAUTH认证服务,这些都足以说明OAUTH标准逐渐成为开放资源授权的标准。
Oauth协议目前发展到2.0版本,1.0版本过于复杂,2.0版本已得到广泛应用。
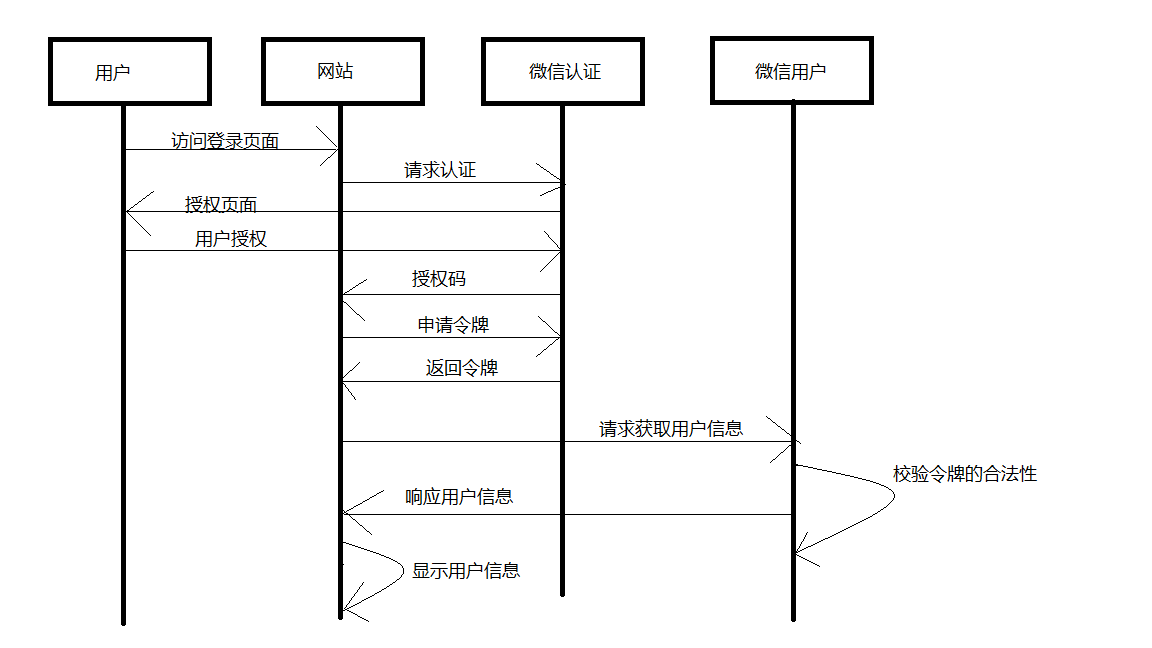
\1. 用户进入网站的登录页面,点击微信的图标以微信账号登录系统,用户是自己在微信里信息的资源
拥有者。
\2. 资源拥有者同意给客户端授权
资源拥有者扫描二维码表示资源拥有者同意给客户端授权,微信会对资源拥有者的身份进行验证,验
证通过后,微信会询问用户是否给授权网站访问自己的微信数据,用户点击“确认登录”表示同意授权,
微信认证服务器会颁发一个授权码,并重定向到网站。
\3. 客户端获取到授权码,请求认证服务器申请令牌
此过程用户看不到,客户端应用程序请求认证服务器,请求携带授权码。
\4. 认证服务器向客户端响应令牌
认证服务器验证了客户端请求的授权码,如果合法则给客户端颁发令牌,令牌是客户端访问资源的通
行证。此交互过程用户看不到,当客户端拿到令牌后,用户在网站看到已经登录成功。
\5. 客户端请求资源服务器的资源
客户端携带令牌访问资源服务器的资源。网站携带令牌请求访问微信服务器获取用户的基本信息。
\6. 资源服务器返回受保护资源
资源服务器校验令牌的合法性,如果合法则向用户响应资源信息内容。
特点
优点:
更安全,客户端不接触用户密码,服务器端更易集中保护
广泛传播并被持续采用
短寿命和封装的token
资源服务器和授权服务器解耦
集中式授权,简化客户端
HTTP/JSON友好,易于请求和传递token
考虑多种客户端架构场景
客户可以具有不同的信任级别
缺点:
协议框架太宽泛,造成各种实现的兼容性和互操作性差
不是一个认证协议,本身并不能告诉你任何用户信息。
授权码模式

登录
认证、授权
设置登录的用户名、密码
1. 配置文件
spring.security.user.name=atguigu
spring.security.user.password=atguigu
2. 配置类
配置后不经过UesrDetailsService
```java
package com.atguigu.config;
@Configuration
public class SecurityConfig extends WebSecurityConfigurerAdapter